

Overview of How To Lay Stepping Stones: A Complete Guide
In this guide, we’ll provide a detailed overview of how to lay stepping stones, from preparation to application and finishing touches.
Garden stepping stones are used to create safe pathways, typically from one area of your garden to another. It’s known that stepping stones are a more cost effective solution compared with a completely paved outdoor area – they require lower maintenance and take less time to clean due to the smaller surface area. There are various stepping stone options including; round stepping stones, square stepping stones, concrete stepping stones and various other materials such as sandstone or slate – concrete being the preferred material due its durable nature.
View our range of popular stepping stones, measuring 600×290 and available in Sandstone, Limestone and Concrete.
Kandla Grey 600×290 Sandstone
Black Sawn Edge 600×290 Limestone
Silver Granite Effect 600×300 Concrete

Table of Contents
Tools & Materials Needed For Laying Stepping Stones
For a professional installation of your stepping stones, we suggest ensuring you have access to the following tools/materials.
- Stepping Stones
- Measuring Tool
- Garden Fork
- Garden Spade
- Rubber Mallet
- Sharp Sand / Cement
- Riddle, or Sieve
- Pointing Trowel
Preparing The Ground Before Laying The Stepping Stones
- Its important to clean the area where you intend to lay stepping stones; brush away any leaves or debris from the focus area and proceed to mark out the pathway, ensuring you know exactly where each stepping stone will be placed – checking the required distance between each slab before you commence digging.
- Further, loosen any compacted soil with a garden fork, removing any stones or roots from the area in the process – this helps when you start to lay the stepping stones.
Top Tip:
It’s worth noting that if children intend to use the stepping stones pathway, placing these stones closer together would help to create a safer pathway and prevent striding.

Preparing The Ground Before Laying The Stepping Stones
Measuring & Spacing Your Stepping Stones
As mentioned briefly in step 2, measuring and spacing your stepping stones is vitally important before you commence digging the area and laying your stepping stones. You may decide to have each stepping stone exactly the same distance from one to another, however you might decide to add some variation to this depending on your design requirements.
If you have young children who will be using the stepping stones pathway, having these stones placed closer together would be beneficial, creating a safer pathway to use without stretching or over stepping.

Measuring, Spacing & Digging Your Stepping Stones
Step-By-Step Process For Laying Stepping Stones
The following will determine how to lay stepping stones in grass and the process to follow when laying stepping stones. The following further identifies how to lay stepping stones without cement and instead using sharp sand.
Step 1) Clean The Area
Firstly, brush away any dirt or debris from the area where you will place your stepping stones. Further loosen any compacted soil, removing any stones or roots in the process.
Step 2) Measure the Space Required Between Each Stepping Stone
Secondly, determine the space you require between each slab.
Step 3) Securing The Stepping Stones In Place
This step is vitally important when laying stepping stones on grass. Once you know the measurements between each slab and where each slab will be placed, you can start digging using a garden spade to the required depth. It’s recommended to dig a hole for each stepping stone that measures approximately 2cm deeper then the thickness of the stone – now spread a layer of sharp sand, approximately 1.5cm in the hole.
For a firmer ground, we recommend using sharp sand to a depth of 1.5cm and using a rubber mallet to help level the stones. However, if the ground is softer, its recommended to use a cement base to avoid the stepping stones sinking overtime, proving additional stability.
Place each stepping stone just below the level of the surrounding soil to make mowing easier, allowing you to mow over the stones instead of around them. It’s important to give each stone a tap with a rubber mallet to make sure there secure and level.
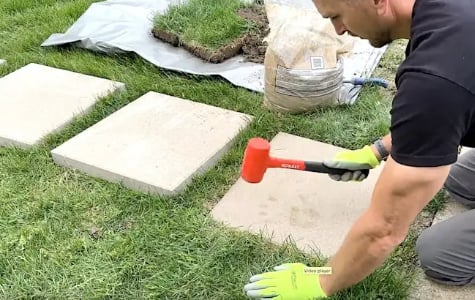
Securing The Stepping Stones In Place
Step 4) Fill In The Gaps
Now, collect surrounding loose soil from the digging process and use a riddle or sieve to shake the soil into the gaps surrounding the stones, ensuring to compact this loose fine soil with fingers or a special pointing trowel tool, ensuring there are no spaces left around the edges.
Lastly, loosen the soil around the stepping stones with a garden rake and place grass seeds or alternatives on top – spreading with a soft brush. You can now water the area regularly to promote grass/seed growth.
Avoid During Installation
Its recommended to avoid standing on the stepping stones for at least 24 hours after placement, allowing them to increase in stability, preventing any stones shifting.
Tips For Maintaining Your Stepping Stones
Now you have installed your stepping stone pathway, the next step is to carefully maintain it to ensure a long lasting result. However, without proper maintenance your stepping stones can become unsightly and have the opposite effect of what was intended for the outdoor space, it can further become a trip hazard due to stones shifting, making the area unsafe for visitors.
Clean Your Stepping Stones
Ensuring to keep the stones clean and debris free would increase there lifespan, further allowing you to notice any shifting during the cleaning process. Regular regular also prevents unintended damage or scratches appearing on your stepping stones – any cracks will eventually expand during the colder months due to the freezing temperatures.
You can wash the stones with a garden hose or basic pressure washer. For tougher stains, use a mild detergent thats doesn’t harm the stone and scrubbing brush.
For our more detailed overview, visit our article: How To Clean Paving Slabs
Stop Weeds From Growing
By allowing weeds to grow overtime, they can eventually push the stepping stones further apart and out of place, making them uneven. To avoid this, its recommended to pull out any weeds as soon as you see them. If you’d prefer, you can use a weed killer, but just make sure it won’t harm your stones or the surrounding environment.
Avoiding Common Mistakes When Installing Stepping Stones
Stepping stones can enhance your garden, but it’s easy to make mistakes during installation.
Not Leveling The Ground
During installation, failing to properly level the area where you’re placing the stones can lead to uneven surfaces, causing them to shift over time. It’s important to ensure the ground is flat and stable before you start.
Spacing Stones Too Close or Too Far Apart
It’s important to find the right distance between stones. If they’re too close, it can be hard to walk between them. If they’re too far apart, it can make the path uncomfortable to walk on. If you have young children who will be using the stepping stones pathway, having these stones placed closer together would be beneficial, creating a safer pathway to use without stretching or over stepping.
Skipping the Gravel Base
A gravel or sand base under the stones helps with drainage and prevents them from sinking. Skipping this step can lead to uneven stones overtime.
Ignoring Weed Control
Weeds can quickly grow between the stones and cause them to shift. Be sure to remove weeds regularly or use a weed barrier beneath the stones.
Additional Related Articles
Top 10 Garden Patio Designs & Ideas
How To Cut Paving Slabs: Step-by-Step Guide
Sharp Sand vs. Building Sand
How To Build Garden Steps
FAQs (Frequently Asked Questions)
What is best to put under stepping stones?
Do stepping stones need to be cemented down?
Its recommended to use a cement base if the ground if soft; this helps to avoid the stepping stones sinking overtime or shifting out of place once layed, providing additional stability.
Its okay to use a sharp sand base if the ground of relatively firm as the addiotnal stability isn’t required.
Can you just lay stepping stones on top of grass?
It’s important to avoid laying stepping stones directly on grass as it has various disadvantages over proper installation techniques. For example, without digging to a required depth and placing the stones in the hole using a cement or sharp sand base, the stones will eventually shift and move overtime.
How deep should stepping stones be?
It’s recommended to dig a hole for each stepping stone that measures approximately 2cm deeper then the thickness of the stone. Now spread a layer of sharp sand or cement, approximately 1.5cm in the hole.

Whether your patio is in need of a comprehensive clean or you're just aiming to refresh your outdoor space, this Read more

In all garden designs, steps serve more than just a practical purpose; they enhance the visual appeal of your outdoor Read more

Patio slab painting is becoming increasingly popular, with people painting paving slabs for various reasons, in particular, painting patio concrete Read more

Stopping weeds from growing between block paving is important because they can damage the surface and make the area look Read more