

How to install Large Format Porcelain?
Over the past few years, there has been a growing trend towards the use of large-format porcelain slabs or tiles for outdoor/indoor paving projects. This trend is due to porcelain having numerous benefits over more traditional, natural stone options; porcelain is known to be more cost effective and available in a variety of styles to suit all design requirements.
It’s important to gather knowledge on how to lay porcelain paving slabs to ensure a smooth and professional finish. In this quick help guide, we’ll delve into how to lay porcelain paving slabs (large format) and why we suggest the 33% offset, providing you with tips and tricks to achieve professional results when laying porcelain slabs.

Example: Allestone Bone 1200×600 Porcelain Paving Slabs
What is Large Format Porcelain?
Large format porcelain tiles or slabs are defined by their large size dimensions, for example; (1200×600) (1200×300) and (900×600).
We supply a broad range of large porcelain tiles to explore, with variety of colour options and design possibilities available.
Popular Options Include:
Allestone Bone 1200×600 Porcelain Paving Slabs
Grove Light Grey Wood Effect 1200×400 Porcelain Paving Slabs
Hammer Grey 20MM 900×600 Porcelain Paving Slabs
The negatives of large format porcelain tiles is that due to the large dimensions, these can get a natural bowing of the tile. This becomes noticeable because porcelain has a convexed surface – theres no avoiding this as it is industry and European standard. Due to this natural bowing on some large tiles, we recommend laying these slabs using the 33% offset pattern; this helps to minimise the visibility of imperfections in the substrate and tiles, further helping to prevent lippage and cracking during installation, resulting in a more refined finish.
Continue reading to determine how to lay porcelain paving (large format) and the steps required to achieve a professional finish.
Installation Guide

Table of Contents
Step 1) Preparing the Substrate Surface
The first step in this how to lay porcelain paving (large format) article, is to ensure the patio surface is clean (debris-free), dry, and level before you start the installation process. Any high/low points or irregularities in the patio space should be smoothed out using a self-levelling compound; achieving a level surface will ensure your paving project has a professional and seamless finish without any issues or obvious irregularities.
Step 2) Applying Adhesive
For the installation of large-format porcelain tiles, it is important to select a high-quality adhesive. One that offers flexibility like our professional grade KPRO Paving Slurry Primer available in a 20KG bag. This is specifically formulated to provide exceptional bond between all types of natural stone and porcelain surfaces. Apply the adhesive to the substrate in small sections so its easily manageable, ensuring you achieve a professional and durable outcome.

Application: Kilsaran KPRO Priming Slurry 20KG
Step 3) Placing Tiles 50% vs. 33% Offset Pattern
- Its important to ensure the precise placement of tiles on the adhesive, this is a crucial step to achieve a level surface and consistent spacing.
- It is recommended to use a levelling tool (large spirit level) to avoid any lippage, ensuring a flawless professional installation.
We recommend laying the large porcelain slabs using the 33% offset pattern (stretcher bond style). If laying with a 50% offset, the convex surface becomes noticeable because you get a low point meeting a high point which in turn means you run the chance of water collecting which can create problems like unwanted cracking especially during the winter months as the surface water freezes – using the 33% offset helps to offset this so you get a better finish.
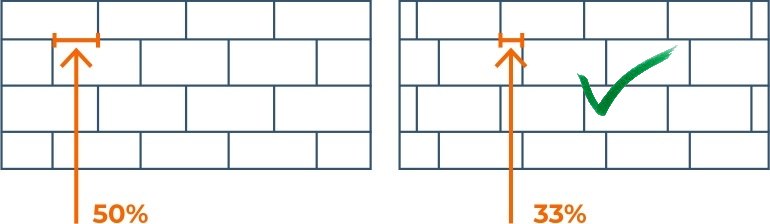
Recommended Stretcher Bond Style (33% Offset Pattern)
Laying porcelain paving slabs using the 33% offset pattern involves staggering tiles by a third of their length known as the (stretcher bond style) rather than aligning them in a traditional 50% pattern (half and half). Among the various options available, this popular “stretcher bond” offset pattern stands out for its unique aesthetic appeal and practical advantages like increased durability and visual aesthetics.
Once the large format porcelain tiles have been properly placed using the 33% Offset Pattern, it is crucial to allow the adhesive to cure for a minimum of 24 hours before continuing with the grouting process.
Step 4) Grouting Your Large Format Porcelain Tiles/Slabs
Grouting paving slabs, also known as pointing, plays an important role in the overall lifespan and performance of your patio. Paving slab grout helps to stabilise the paving slabs, reducing the risk of movement and unwanted cracking. Additionally, effective grouting prevents weeds from growing between the joints and minimises water damage, which can lead to erosion and subsidence over time.
When installing your patio, there is a wide range of jointing compounds and paving grouts available for filling the gaps between your paving slabs. These products vary in price and possess distinct characteristics, for example; some grouting options are precisely formulated for porcelain paving like our recommended Projoint Rapid Flow Brush-In Porcelain Grout while others cater to natural stone paving. It’s recommended to choose a grout colour that matches the tiles to ensure a seamless finish. However, for a more distinctive look and feel, use a contrasting grouting colour.

Projoint RapidFlow Brush In Porcelain Grout
APPLICATION VIDEO
Step 5) Surface Cleaning & Sealing
After the grout has finished curing, make sure to thoroughly clean the surface before applying a sealer to safeguard the tiles against future staining and damage. Our recommended porcelain sealer is the professional grade Nexus Pre-Grout Stone & Porcelain Paving Sealer, available in a 1 litre bottle. After laying porcelain slabs and grouting is finished, this Pre-Grout Stone & Porcelain Paving Sealer can be used once any grouting has been completed and is fully cured, to protect the paving and aid with the prevention/removal of unwanted stains.
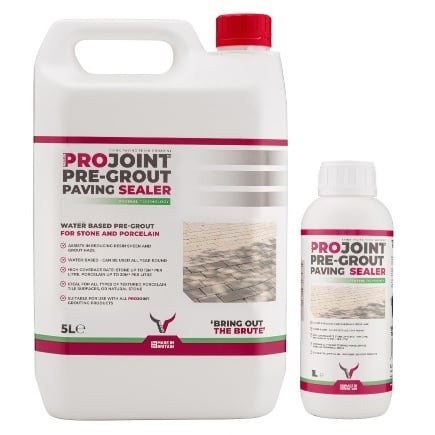
ProJoint Pre Grout Paving Sealer
Additional Related Articles
How To Lay Patio Slabs
How To Grout Paving Slabs
Complete Guide to Laying Indian Sandstone Paving Slabs
FAQs (Frequently Asked Questions)
Why should I choose Porcelain over a Natural Stone Patio?
Laying porcelain slabs offers many qualities that set it apart from natural stone, whether used for indoor/outdoor design projects. Unlike natural stone, porcelain requires little maintenance. Its further benefit is its naturally resistant to moisture, enhanced with the use of a special porcelain sealant. Further, its noted to have a lesser environmental impact compared to natural stone alternatives.
Are porcelain slabs more difficult to lay?
With careful planning and the right tools, laying a porcelain patio can be a manageable DIY project. However, it requires attention to detail and proper execution to ensure a professional finish. It’s recommended to contact an experienced landscaper if you have little experience with paving projects, mistakes can be costly.
Does porcelain get slippery when its wet?
The quick answer is NO, as long as they are properly maintained. Due to the smooth appearance, they look slippery, however, porcelain is produced to resist slippage ensuring a safer outdoor area. Since the weather in the UK can change drastically in a single day, it is crucial to make sure our outdoor spaces are capable of withstanding this, a high grade porcelain sealer will help to prevent any damages.

Whether your patio is in need of a comprehensive clean or you're just aiming to refresh your outdoor space, this Read more

In all garden designs, steps serve more than just a practical purpose; they enhance the visual appeal of your outdoor Read more

Patio slab painting is becoming increasingly popular, with people painting paving slabs for various reasons, in particular, painting patio concrete Read more

Stopping weeds from growing between block paving is important because they can damage the surface and make the area look Read more