

Overview of How To Install Indian Sandstone Paving
Installing Indian Sandstone Paving, also known as Indian sandstone pavers, can be a rewarding project, giving your outdoor space a beautiful, natural stone finish that complements natural elements of your garden. In this how to lay Indian sandstone slabs guide, we will discuss the important steps to follow to ensure a professional finish that will last for years to come.

Table of Contents
Choosing the best Indian Sandstone Paving
In order to proceed with the installation process, you first need to select the Indian Sandstone paving that you would like use, choose from our Smooth Sandstone or Riven Sandstone in a variety of colour and size options, the choice is yours.
Size Options:
- 600×290 Paving
- 600×600 Paving
- 900×600 Paving
- Mixed Size Paving
- 100×100 Cobble Setts
- 200×100 Cobbles Setts
Colour Options:
- Kandla Grey
- Autumn Brown
- Fossil Mint
- Raj Green
- Sagar Black
- Rippon Buff
- Mint Ivory
- Rainbow Mixed
The most popular Indian Sandstone is from our Kandla Grey sandstone collection, also available in the more durable, less maintenance Porcelain material.
Kandla Grey 900×600 Riven Sandstone Paving Slabs
Tools & Materials Required for Installation
Tools
- Wheelbarrow
- Sprit Level
- Rubber Mallet
- Tape Measure
- Protective Gloves
- Shovel / Space
- Rake
- String Line
- Pointing Tool
- Trowel
- Sponge
Materials
- Sandstone Paving
- Sand
- Cement
- Water
- Sub-Base Material (Crushed Stone or MOT Type 1)
How To Install Indian Sandstone Paving
Step 1: Determine Paving Placement
- Select the area where you plan to lay your sandstone paving, ensuring it is stable, level, and properly drained.
- It’s recommended to mark the area for efficiency and accuracy before you start digging the foundation.
Step 2: Digging the Foundation
- Start digging the marked area with a shovel to a minimum depth of 125mm, plus the thickness of the paving (check paving description), removing all vegetation and topsoil from the surface.
- The finished surface should be at least 150mm below the damp proof course of the house. Its recommended to use a tape measure for accuracy.

Digging The Foundation
Step 3: Level the Foundation
It’s important to level the foundation before proceeding.
- Set up string lines to measure the falls and use a rake to level the area.
- Now, compact the entire surface with a garden roller or tamper.
- Use a spirit level to ensure the foundation is level before proceeding.
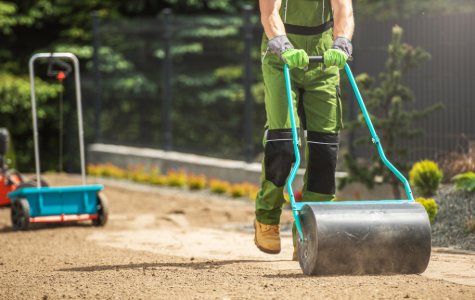
Level The Foundation
Step 4: Apply the Foundation Base
- Apply and compact a 50mm layer of sub-base material (Crushed Stone or MOT Type 1)
- Repeat the process to achieve an overall sub-base depth of 100mm.
- Ensure the area has a sufficient slope to allow proper surface water drainage.
Step 5: Preparing the Indian Sandstone Slabs
- Wash the slabs with a sponge and clean water, removing any dust or dirt on the slabs surfaces.
- Using protective gloves, Prime the backs of the paving slabs with a specific priming product or fine mortar slurry.
- We recommended our KPRO Paving Slurry Primer for a more professional finish.
Priming Indian sandstone slabs before installation improves adhesion, ensuring a stronger bond between the stone and mortar. It reduces water absorption, preventing staining and weakening, and protects the surface from mortar marks. Priming also provides a more consistent finish, enhancing the durability and longevity of the paving.
Top Tip:
Using protective gloves when priming the paving slabs can help reduce the risk of skin irritations, cuts or scratches.

Preparing the Indian Sandstone Slabs
Step 6: Mortar Preparation
- Prepare a mortar mix using four parts sand to one part cement, adding water until the mixture reaches a “wet” and workable consistency thats similar to thick custard.
- For efficiency and accuracy, apply a full mortar bed to a small section first and level it to ensure the bed is roughly 30mm thick.
- Once you are satisfied with the placement of one slab, proceed to the next step.
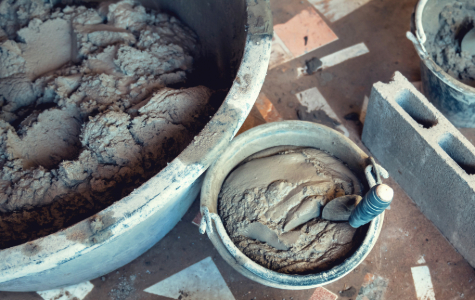
Mortar Preparation
Step 7: Laying the Sandstone Paving Slabs
- Start laying the sandstone paving on the full mortar bed, leaving a gap of 8 to 10mm between each slab.
- Now, gently tap the centre of the slabs into the mortar with a rubber mallet to secure them in place.
- Use a spirit level to ensure the slabs are level and accurate throughout this laying process.
Top Tip:
Using a Rubber Mallet absorbs the impact when tapping the slabs, preventing the slabs from cracking during installation.
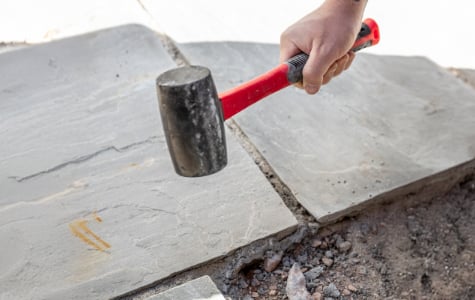
Laying the Sandstone Paving Slabs
Step 8: Jointing the Paving Slabs
- To joint the paving slabs, prepare a mortar mix with three parts soft building sand to one part cement.
- Gradually add water, mixing it slowly until you achieve a smooth, damp consistency—it should resemble a very thick custard.
- Use a trowel to fill the joints, pressing the mortar down and smoothing it over with a pointing tool.
- Take care not to let any mortar spill onto the surface of the paving slabs, as this could cause staining.
Top Tip:
If mortar does get on the surface on the slabs during application, wipe it off immediately to prevent staining.

Jointing Sandstone Paving Slabs
Step 9: Allow Setting Time
Once the mortar has set and is hard, simply give the area a thorough sweep, and the job is complete! We recommend allowing a minimum of 24 hours to set before you begin walking on the paved area, and allow 36 hours to set in wet weather conditions.
Sealing & Maintaining your Indian Sandstone Paving
Sealing Sandstone Paving Slabs
In order to preserve the durability and overall appearance of your sandstone paved area, start by sealing it with a suitable stone sealer to protect it from stains and weather damage. We recommend our professional grade EASYSeal Sandstone Enhancer & Sealer, available in 5 litre tubs.
Its recommended to reapply the sealer every 1-2 years to keep the paving looking its best, and further ensuring its durability by adding a protective layer against weathering.

EASYSeal Sandstone Sealer & Enhancer
Maintaining Sandstone Paving Slabs
For general sandstone maintenance, you can clean the surface regularly with a mild detergent and a soft brush, removing any stains promptly. Additionally, prevent weed growth by regularly checking the joints and removing any weeds by hand or using a weed removal tool. With proper care, your sandstone paving will remain durable and beautiful for years to come.
Avoiding Common Mistakes During Installation
Poor Base Preparation
Improper base preparation can result in uneven settling. Make sure to create a well-compacted, stable sub-base to ensure proper drainage and support.
Incorrect Mortar Mix
Using an incorrect mortar mix or excessive water can lead to shifting or cracking of the paving. Follow the proper sand-to-cement ratio to achieve a strong, workable mix.
Uneven Paving Slab Placement
Not checking for levelness regularly during installation can lead to an uneven surface. Use a spirit level and rubber mallet to keep the paving slabs flat and aligned.
Not Sealing Sandstone Paving Slabs
Skipping the sealing step leaves the stone vulnerable to stains and weathering. Sealing your sandstone paving helps protect it and enhances its longevity.
Why Indian Sandstone is ideal for Paving
Natural Stone Resilience
Crafted from natural stone, Indian Sandstone Paving ensures durability and resilience in various weather conditions. Embrace the charm of a timeless material that weathers gracefully, evolving with character over time.
Durability
Indian sandstone is incredibly strong and can withstand heavy foot traffic and varying weather conditions, ensuring long-lasting performance.
Cost Effectiveness
Compared to other natural stones, Indian sandstone is more affordable, offering excellent value for the quality it provides.
Easy Maintenance
With proper maintenance using our recommended professional grade EASYSeal Sandstone Enhancer and Sealer available in a 5 litre tub, you can ensure your sandstone slabs will retain their beauty and strength for years to come.
FAQs (Frequently Asked Questions)
What should Indian sandstone be laid on?
This is an important step during the Indian sandstone paving installation process.
Its recommended to lay Indian sandstone slabs on 50mm compacted layer of sub-base material, such as MOT Type 1 or 40mm Crushed Stone.
Do you need to prime Indian sandstone slabs?
Priming Indian sandstone slabs before installation improves adhesion, ensuring a stronger bond between the stone and mortar. It reduces water absorption, preventing staining and weakening, and protects the surface from mortar marks. Priming also provides a more consistent finish, enhancing the durability and longevity of the paving.
Can you point Indian sandstone with sand and cement?
Yes, you can point Indian sandstone with a sand and cement mix, typically 4 parts soft sand to 1 part cement. Apply the mortar to fill the joints, pressing it in and smoothing it off. Avoid spilling mortar on the surface to prevent staining; wipe off any spills immediately.
Is it a good idea to seal Indian sandstone?
Yes. In order to preserve the durability and overall appearance of your sandstone paved area, start by sealing it with a suitable stone sealer to protect it from stains and weather damage. We recommend our professional grade EASYSeal Sandstone Enhancer & Sealer, available in 5 litre tubs.
Its recommended to reapply the sealer every 1-2 years to keep the paving looking its best, and further ensuring its durability by adding a protective layer against weathering.

Whether your patio is in need of a comprehensive clean or you're just aiming to refresh your outdoor space, this Read more

In all garden designs, steps serve more than just a practical purpose; they enhance the visual appeal of your outdoor Read more

Patio slab painting is becoming increasingly popular, with people painting paving slabs for various reasons, in particular, painting patio concrete Read more

Stopping weeds from growing between block paving is important because they can damage the surface and make the area look Read more